
Imagine you’re ready to hit the road on your bike, but you notice the pedals are worn out or damaged. You’ve decided it’s time for a change, but you’re not sure where to start.
You’re in luck! Removing bicycle pedals can be straightforward, and we’re here to guide you through it step by step. As you read on, in this guide on how to remove bicycle pedals, you’ll discover how easy it is to swap out those old pedals for new ones, enhancing your cycling experience.
Whether you’re a seasoned cyclist or a newbie, this process can be a breeze with a little guidance. So, let’s explore and get those pedals off your bike, making way for smoother rides and better performance. Your bike deserves the best, and you’re about to learn how to give it just that.
Table of Contents
Tools Needed
Essential tools for removing bicycle pedals include a pedal wrench, a 15mm open-end wrench, and a bit of grease. These tools help loosen and remove the pedals easily, ensuring a smooth process.
Removing bicycle pedals might seem daunting initially, but with the right tools, it’s straightforward. Imagine the satisfaction of swapping out old pedals for shiny new ones, enhancing your ride and performance. Are you ready to discover what you need to do the job?
Basic Toolkit
You don’t need a workshop full of tools to change pedals—just a few key items. A pedal wrench is your best friend. This tool is designed to fit the narrow space between the pedal and crank arm. A regular wrench might work if you don’t have a pedal wrench, but you might find it awkward to use.
Allen Key
Some pedals require an Allen key instead of a wrench. Look at the back of the pedal to see if there’s a socket for an Allen key. If there is, you’ll need this tool to get started. Allen keys come in various sizes, but 6mm and 8mm are commonly used for pedals.
Grease
Have you ever struggled with a stubborn pedal that won’t budge? Grease can be the unsung hero here. Applying a thin layer of grease on the pedal threads before installation can save you a headache later. It helps prevent rust and makes future removal easier.
Optional Tools
Sometimes, pedals are stuck, and a rubber mallet can help loosen them. A bike stand might also be useful to stabilize the bicycle while working, preventing accidental falls or scratches.
Practical Insights
Have you ever tried removing pedals without these tools? It can be a real struggle. Using the right tools makes the process smoother and protects your bike from damage. The last thing you want is to round off the corners of your pedals or crank arms.
Engage And Prepare
Before you explore the task, ask yourself: Is your toolbox ready for the job? Preparing beforehand can save you a trip to the hardware store halfway through. Is there a tool you’ve overlooked that could make all the difference? Embrace the challenge confidently, knowing you have the tools for a smooth pedal change. Your bike will thank you for it!
Preparing The Bike
Preparing your bike is the first step in removing the pedals. This ensures a smooth and safe process. Correct preparation minimizes risks and makes the job easier.
Positioning The Bicycle
Find a flat surface for your bicycle. This keeps the bike stable while you work. Use a bike stand if you have one. A stand holds the bike upright. Ensure the bike is not leaning. This prevents accidental falls. The bike should be at a comfortable height. You should be able to reach the pedals easily.
Safety Precautions
Wear gloves to protect your hands. Bicycle pedals can be greasy, and gloves keep your hands clean. Use eye protection to guard against debris. Loose parts can fly off unexpectedly. Keep tools organized and within reach. This avoids unnecessary movements. Ensure the workspace is clear. A cluttered space can cause accidents.
Identifying Pedal Types
Knowing your pedal type is crucial for proper maintenance. Pedals come in various designs, each requiring specific handling. Let’s explore the most common types, which will help you identify them easily.
Standard Pedals
Standard pedals are basic and common. They have flat surfaces and usually rubber or metal grips. These pedals suit regular cycling and are simple to remove and replace. You need a standard wrench to work with them.
Clipless Pedals
Clipless pedals are popular among enthusiasts. They have a unique locking mechanism that secures your foot to the pedal, improving efficiency and control. You need special cycling shoes to use them. Removing clipless pedals requires a bit of care. A pedal wrench or Allen key is usually needed.

Credit: www.youtube.com
Loosening The Pedals
Removing bicycle pedals can be tricky. Correct technique is crucial. Begin by loosening the pedals. This is an important step. Proper tools and knowledge are key to success. Let’s explore the details.
Understanding Thread Direction
Thread direction matters. Each pedal is different. The right pedal loosens counterclockwise. The left pedal loosens clockwise. This might seem unusual. But it’s true. Knowing this prevents damage. Use this knowledge to your advantage.
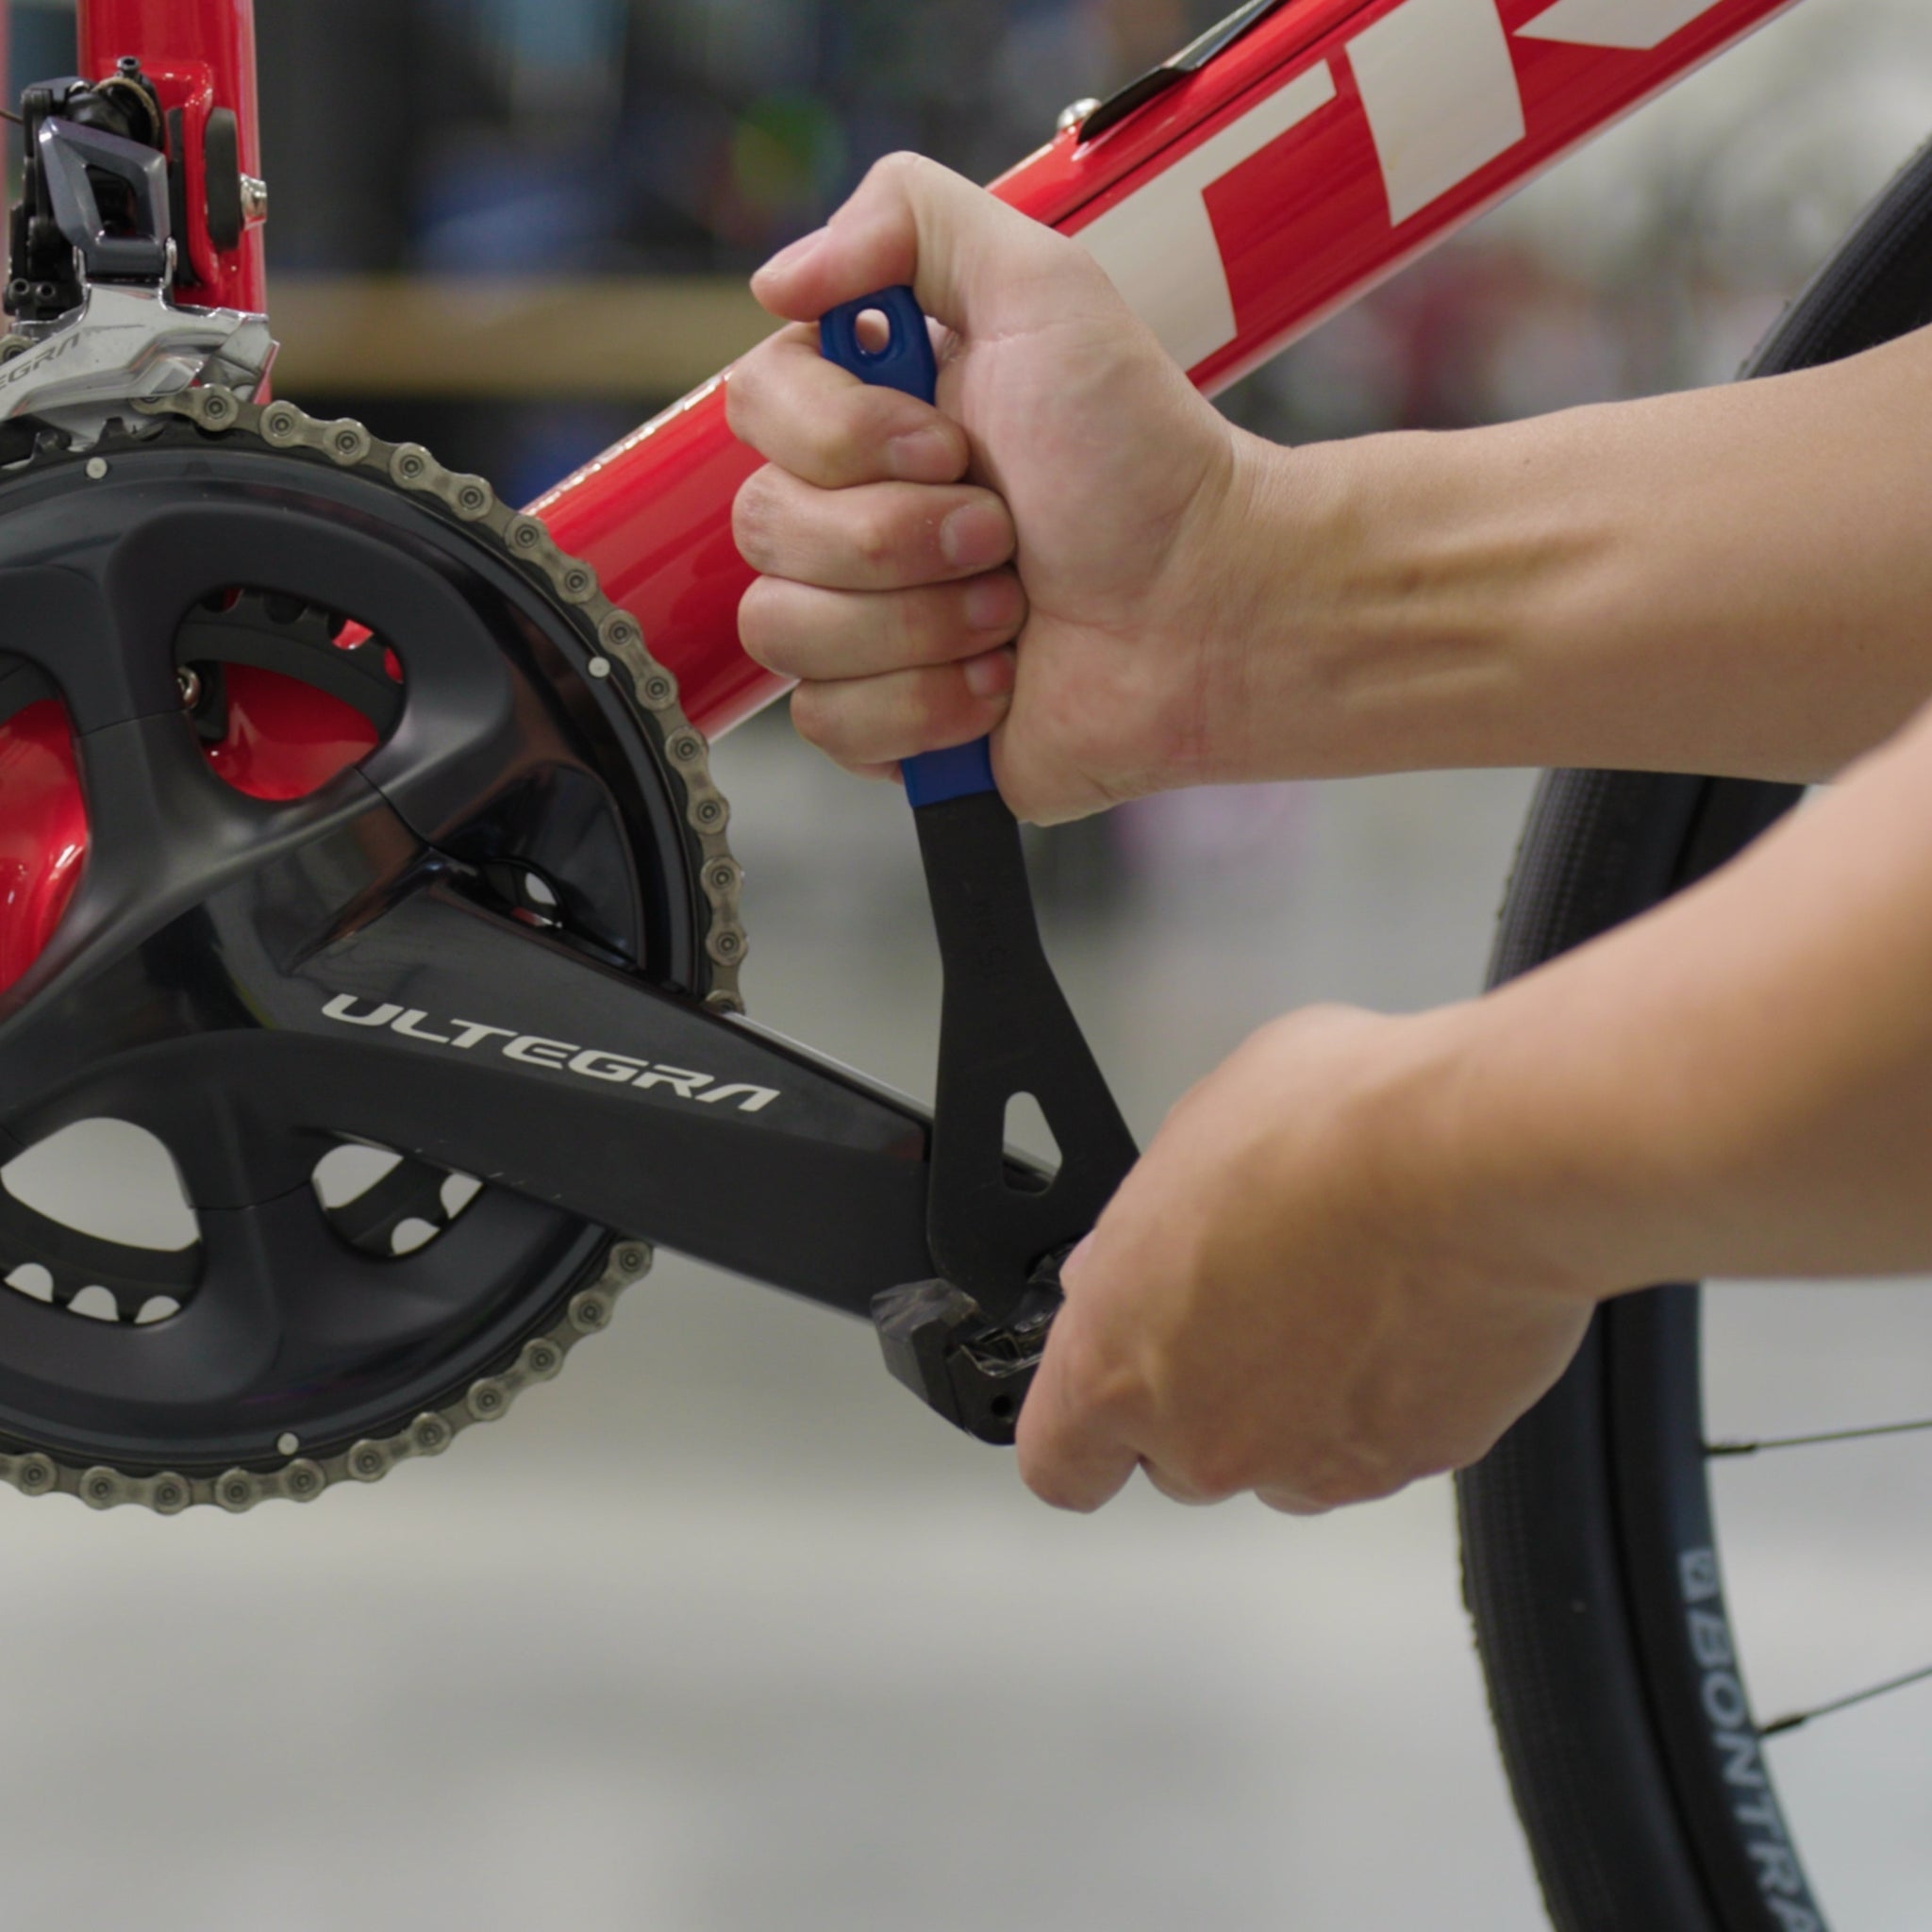
Using A Pedal Wrench
A pedal wrench is essential. It fits perfectly and provides leverage. Position the bike securely. Attach the wrench to the pedal. Apply force carefully. Turn in the correct direction. The pedal will loosen smoothly. Take your time. Avoid using excessive force.
Removing The Pedals
Removing bicycle pedals is necessary for maintenance or transport. Knowing the right steps helps avoid damage and makes the process smooth and simple. Each pedal is different, so understanding the correct removal method is key.
Left Pedal Removal
The left pedal has a reverse thread. This means it loosens clockwise. Use a pedal wrench or an Allen key. Place the tool on the pedal axle. Hold the crank arm steady. Turn the tool clockwise to loosen the pedal. Keep turning until the pedal comes off. Be careful not to strip the threads.
Right Pedal Removal
The right pedal has a standard thread. It loosens counterclockwise. Use the same tools as for the left pedal. Place the tool on the pedal axle. Hold the crank arm steady. Turn the tool counterclockwise to loosen. Continue until the pedal is fully removed. Remember to clean the threads after removal. This helps with future maintenance.
Credit: www.theproscloset.com
Cleaning And Maintenance
With the right tools, removing bicycle pedals is simple. Turn the wrench counterclockwise for the left pedal. The right pedal unscrews clockwise. Clean threads and apply grease before reattaching. This prevents rust and ensures smooth cycling. Regular maintenance keeps your bike in top shape.
Maintaining your bicycle pedals is crucial for smooth rides and long-lasting performance. Regular cleaning and maintenance can prevent rust, ensure easy removal, and enhance your cycling experience. You might be surprised at how much difference a little care can make. Whether you’re a seasoned cyclist or a weekend warrior, cleaning and maintaining your bicycle pedals will pay off with effortless rides and fewer issues on the road.
Inspecting The Threads
Begin by carefully inspecting the threads of your pedals. This is where dirt and grime tend to accumulate. Look for any signs of wear or damage. Are the threads smooth, or do they appear stripped? A quick check can prevent headaches down the line. If the threads look compromised, seek professional help to avoid further damage.
Lubrication Tips
Lubrication is key to pedal maintenance. Choose a high-quality lubricant suitable for bike parts. Apply a small amount to the threads and axle. This helps prevent rust and makes future removal easier. Remember, a well-lubricated pedal spins smoothly, saving you energy during your rides. Have you ever struggled with removing a stubborn pedal? A little lubrication could be the trick you need.
A clean and well-maintained pedal can transform your biking experience. It’s not just about keeping your bike in top shape but ensuring each ride feels effortless. What maintenance routine do you follow to keep your pedals in perfect condition? It may be time to add inspection and lubrication to your checklist.
Reinstalling Pedals
Removing bicycle pedals involves a few simple steps. First, gather a pedal wrench and lubricate the threads. Next, turn the pedal opposite to the direction you ride, left on the left side and right on the right. Keep turning until the pedal detaches.
Reinstalling bicycle pedals might seem straightforward, but a few key steps ensure they fit securely and function smoothly. Whether swapping pedals for an upgrade or simply reattaching them after maintenance, getting it right is crucial. The process involves correct threading and tightening securely. Done correctly, it can enhance your cycling experience and prolong the lifespan of your bike components.
Correct Threading
When reinstalling pedals, pay attention to the threading direction. The right pedal threads clockwise, while the left pedal threads counterclockwise. Mixing this up is easy, especially if you’re new to bike maintenance. Ensure you’re aligning the pedal axle with the crank arm threads correctly. Misthreading can damage the threads, making future installations a hassle. Remember, a gentle start when threading is a good way to avoid cross-threading. If you feel resistance, stop and realign the pedal.
Tightening Securely
Once threaded, secure the pedals by tightening them. Use a pedal wrench or an Allen key, depending on your bike’s design. Pedals need to be snug, but avoid overtightening. Extreme force can strip the threads, leading to costly repairs. A tip from personal experience: after a couple of rides, double-check the pedals. Vibrations can sometimes loosen them. Wouldn’t you want to avoid that mid-ride surprise? What steps do you take to ensure your bike parts are secure? Do you have a routine or checklist? Share your thoughts and experiences in the comments below!
Troubleshooting Common Issues
Removing bicycle pedals can be tricky but manageable with the right tools. Start by securing the bike and using a pedal wrench. Turn the wrench counter-clockwise on the left pedal and clockwise on the right pedal to loosen them.
Removing bicycle pedals might seem straightforward, but sometimes you encounter unexpected hurdles. These obstacles can be frustrating, especially if you’re in a hurry. Let’s explore two common issues you might face and how to overcome them.
Stuck Pedals
A stuck pedal can turn a simple task into a test of patience. This often happens due to rust or dirt buildup. Start by applying some penetrating oil around the pedal threads. Let it sit for a few minutes to loosen the grip. Use a pedal wrench for better leverage. Remember, the left pedal has a reverse thread that loosens clockwise. If it’s still stubborn, gently tap the wrench with a rubber mallet. Have you ever had to deal with a bolt that wouldn’t budge? This is similar, but with the right tools, you can conquer it.
Cross-threading
Cross-threading can be a nightmare, but understanding it can save your pedal and crank arm. It occurs when the pedal is not aligned properly during installation, damaging the threads. Always start threading the pedal by hand. Feel for any resistance—this is your cue to stop and realign. If you’ve already cross-threaded, don’t panic. Try using a thread chaser or tap to clean the threads. This might sound technical, but it’s like brushing tangled hair; you’re just smoothing things out. Have you ever wondered why some tasks are best done slowly? This is one of them. Taking a moment to troubleshoot can save you time and frustration. Now, how do you handle unexpected challenges when working on your bike?

Credit: www.theproscloset.com
Frequently Asked Questions
How Do I Identify Pedal Direction?
Most pedals have markings for direction: “L” for left, “R” for right. The left pedal unscrews counterclockwise, while the right pedal unscrews clockwise. Knowing this helps avoid stripping threads and ensures smooth removal. Always check for these markings before attempting to remove or replace bicycle pedals.
What Tools Are Needed To Remove Pedals?
You’ll need a pedal wrench or an Allen key. Pedal wrenches are longer, providing better leverage for stubborn pedals. Allen keys are used for pedals with inset screws. Ensure these tools fit your pedal type to avoid damage. Having the right tool makes pedal removal easier and safer.
How Can I Loosen Stuck Pedals?
Apply penetrating oil to loosen stuck pedals. Wait a few minutes for the oil to seep in. Use steady force with a wrench or key. Avoid sudden jerks, which may damage threads. Ensure you’re turning in the correct direction to ease removal effectively.
Can I Remove Pedals Without Special Tools?
Yes, you can use regular wrenches if they fit well. Ensure you have enough leverage to avoid injury. If pedals are stubborn, a pedal wrench is recommended. It’s longer and designed for a better grip. Regular tools may work, but be cautious to prevent damage.
Conclusion
Removing bicycle pedals is simple with the right steps. First, gather your tools. A pedal wrench works best. Turn counter-clockwise for the right pedal and clockwise for the left. Remember, pedals have opposite threads. Tight spaces? Use a thinner wrench. Clean threads before installing new pedals.
This prevents rust. Always check pedal tightness before riding. Loose pedals can be dangerous. Practice makes perfect. Repeat these steps, and you’ll gain confidence. Soon, you’ll change pedals like a pro. Enjoy your cycling adventures with secure pedals.